
Installing just ruby is not sufficient on debian. The openssl/ssl.h is missing. It must be installed via libssl-dev. Than the installation of neocities cli succeeds.
# apt install ruby-full
# apt install libssl-dev

# gem install neocities
See also: superuser.com
In order to setup anonymous FTP access first create the ftp user:
# useradd -g guest -L default -G users -s /sbin/nologin -c "Anonymous FTP user" -d /home/ftp ftp
The -m option is not used, so no skeleton files are copied to the home directory.
# mkdir -p /home/ftp/etc
# chmod 0555 /home/ftp/etc
# echo "This is my FTP site" > /home/ftp/etc/motd
# chmod 0444 /home/ftp/etc/motd
# mkdir /home/ftp/pub
# chown <youruser>:users /home/ftp/pub
# echo "Connected to myftpsite" > /etc/ftpwelcome
Create /etc/ftpd.conf:
portrange	all	65436	65535
display		all	.message
portrange is for passive ftp. It defines the range for the data transfer. In this example there are only 100 ports defined. This is sufficied for a LAN setup. If your ftpd runs on the internet you will need to lower the left (minports) entry in order to have more ports available.
display defines the filename for a message that appears when you enter a directory. Typically this is .message.
Your ftpd listens on port 21 and the ports defined bye portrange in /etc/ftpd.conf. These ports need to be opened in your /etc/npf.conf if you have npf running on your system. Add the following lines to your npf.conf:
pass stateful in on $wired_if proto tcp to $wired_addrs port ftp
pass stateful in on $wired_if proto tcp to $wired_addrs port 65436-65535
Reload npf.conf:
# npfctl reload
Add the following line to your /etc/rc.conf
ftpd=YES
# service ftpd start
$ ftp -a 127.0.0.1
In order to connect from another host use the IP address of your FTP host.
See also: ftpd(8) Manual Page :: ftpd.conf(5) Manual Page :: Set up a FTP server on NetBSD using ftpd(8)
NetBSD ships with the bozohttpd daemon. A very simple webserver entirely configured via command line options.
First configure /etc/rc.conf:
httpd=YES
This line makes httpd to start at boot time. In order to start the daemon witout reboot run as root:
# service httpd start
The server looks in /var/www/ for his files to serve. Just create and edit index.html:
# vi /var/www/index.html
Thats it. A very simple setup.
If you want to add a extra disk to your NetBSD system do the following steps:
# dd if=/dev/zero of=/dev/wd1 bs=512 count=2048
# fdisk -u /dev/wd1
# disklabel wd1 > x
# vi x
# disklabel -R -r wd1 x
# newfs /dev/wd1a
# rm x
See also: Adding a new hard disk
First edit /etc/rc.conf:
ip6mode="autohost"
dhcpcd="YES"
dhcpcd_flags="-6"
autohost configures a host (not a router). Additionally we want dhcpd only for IPv6, not for IPv4. If you want it for both, just leave out the dhcpd_flags line.
If you want to configure a static IPv6 address edit /etc/ifconfig.<IF>:
up
media autoselect
inet6 XXXX:XXXX:XXXX:XXXX::1 prefixlen 64 alias
Where <IF> is the interface name. If you don't know your interface name, type:
# dmesg | grep phy
Replace XXXX in the above example with your IPv6 prefix. If you need several IPv6 addresses on this host, just add additional alias lines to /etc/ifconfig.<IF>. Usually replace ::1 with your needs.
If you want to prevent dhcpd from altering /etc/resolv.conf put the following line into your /etc/dhcpcd.conf:
nohook resolv.conf
See also: IPv6 Networking FAQ
                           Internet
                               |
                               |
                           +--------+
			   | Router |
                           +--------+
                 LAN           |
            +-------------+----+---------------+
            |             |                    |
         +-----+       +-----+              +-----+
	 |  A  |       |  B  |              |  S  |
	 +-----+       +-----+              +-----+
	  Debian        Debian               NetBSD
The setup includes two Debian workstations A and B and a NetBSD server S. S has a static IPv6 address. B can ping6 and connect with IPv6 to S as expected. From A it is not possible to ping6 or connect to S. A and B are identical installations. Especially the firewall setup is identical. ICMP for IPv6 is allowed, so neighbor discovery should work. Needless to remark that with IPv4 all hosts can connect to each other.
Using the link local address from S it is possible to ping6 S from A. So, the problem only occurs if S's static IPv6 address is used.
Running ip -6 neigh show on A and B shows that on A the neighbor discovery reports FAILED. Running:
# ip -6 neigh replace XXXX:XXXX:XXXX:XXXX::1 lladdr YY:YY:YY:YY:YY:YY dev eno1
On A, where XXXX:XXXX:XXXX:XXXX is the /64 prefix of the IPv6 network and YY:YY:YY:YY:YY:YY is the MAC address of S, solves the problem. Now it is possible to ping6 and connect S from A.
To check if there could be a hardware problem A is booted with the OpenBSD live system FuguIta. ping6 was successful.
Conclusion: Because B can connect to A it can neighter be a Debian nor an NetBSD problem. It cannot be a hardware problem with A, because OpenBSD works on A. It must be a overseen difference in the setup. Because the graphical NetworkManager is used it is difficult to compare. So far no differences have been spotted.
See also: Neighbor Discovery Protocol.
NetBSD ships with a layer 7 blocklist. In order to set it up, copy the example to /etc:
# cp /usr/share/examples/blocklist/blocklistd.conf /etc
Additionally you need npf running and configured. Copy the example to /etc and edit it to your needs:
# cp /usr/share/examples/npf/host-npf.conf /etc/npf.conf
Put the necessary flags in /etc/rc.conf:
npf=YES
npfd=YES
blocklistd=YES
blocklistd_flags="-r"
To start all the services, reboot.
To query blocklistd type:
# blocklistctl dump -war
See also: How to set up blocklistd :: NetBSD desktop pt.3: simple stateful firewall with NPF :: NPF documentation.
This howto refers to apache2 on debian.
If you want to protect content with a password on the apache webserver you can do this in the following way:
Add AllowOverride All to the directory you want to protect:
<Directory /var/www/html>
	Options Indexes FollowSymLinks
	AllowOverride All
</Directory>
The configuration file to add these is eighter /etc/apache2/apache2.conf or one of the configuration files in /etc/apache2/sites-available.
Create the .htpasswd file in a directory outside your webspace. This directory must not be accessable via the apache webserver. The initial call of htpasswd is with option -c to create the file:
# mkdir /var/www/passwd
# htpasswd -c /var/wwww/passwd/htpasswd user1
Additional users may be added without -c option:
# htpasswd /var/wwww/passwd/htpasswd user2
Create a .htaccess file in the directory you want to protect:
AuthType Basic
AuthName "restricted area"
AuthUserFile /var/www/passwd/.htpasswd
require valid-user
This file references to the .htpasswd file. The AuthName string is displayed to the user in the password dialog.
On debian use systemctl to finally reload the configuration file:
# systemctl reload apache2
See also: Authentication and Authorization
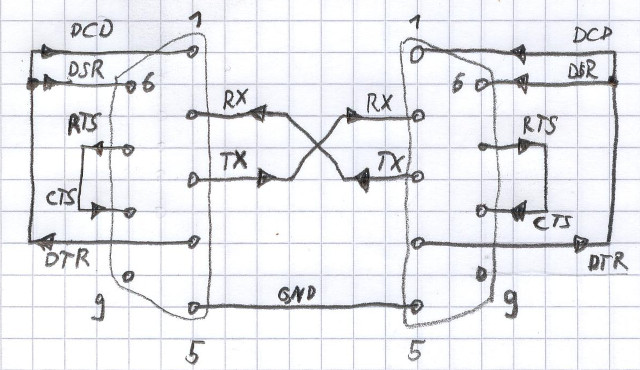
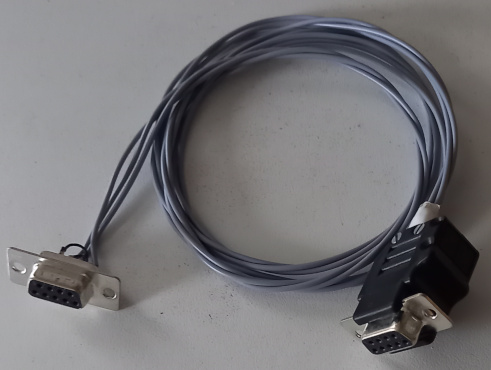
The 3-wire null modem cable I build.